
Cockpits & Setups
Home Flight Simulator Setup: Planning Space and Budget
The short answer
Plan your home flight simulator setup around your actual room, not an aspirational one. A chair or desk mount needs no dedicated space at all; a full seated cockpit needs roughly 1.5m by 1m of permanent floor space plus room to sit down and stand up.
Last updated September 2026
| Chair or desk mount footprint | No dedicated floor space. Uses your existing desk or chair. |
|---|---|
| Full cockpit footprint (reference) | Next Level Racing's Flight Simulator cockpit measures 153 x 99 x 122 cm (L x W x H), per Next Level Racing's own specifications. |
| Full cockpit weight (reference) | 49.5 kg (109.1 lbs) for Next Level Racing's Flight Simulator; 80 kg (176 lbs) for its Flight Simulator Pro. |
| User size range a full cockpit needs to fit | Next Level Racing lists its Flight Simulator cockpit as supporting users 120-210 cm tall (4ft to 6ft 9in) and up to 150 kg (330 lbs). |
| Cheapest realistic starting point | A stick or yoke you already own, clamped to a chair or a sturdy desk. No frame purchase required. |
Scroll for more →
What's covered8
- Home flight simulator setup space planning, tier by tier
- Budget planning: hardware first, frame second
- Weight is a real planning factor, not a footnote
- Think about the room, not just the rig
- Power, screens and cables
- A realistic starting order
- Who this guide is for
- Verdict: planning a home flight simulator setup
Planning a home flight simulator setup comes down to two honest questions. How much floor space can you give up for good? And how much do you want to spend before you know you'll use it? Answer those before you look at any product. Your space and budget decide which tier fits your room: a chair mount, a desk mount or a full cockpit.
Home flight simulator setup space planning, tier by tier
A chair or desk mount needs no floor space of its own. Your stick, throttle or yoke clamps to a chair or desk you already have. It comes off again if you need the space for something else.
This is the right tier for a shared room or a small apartment. It also suits anyone who isn't sure yet how much they'll fly. Our HOTAS chair mount roundup covers current mount picks if this is your stage.
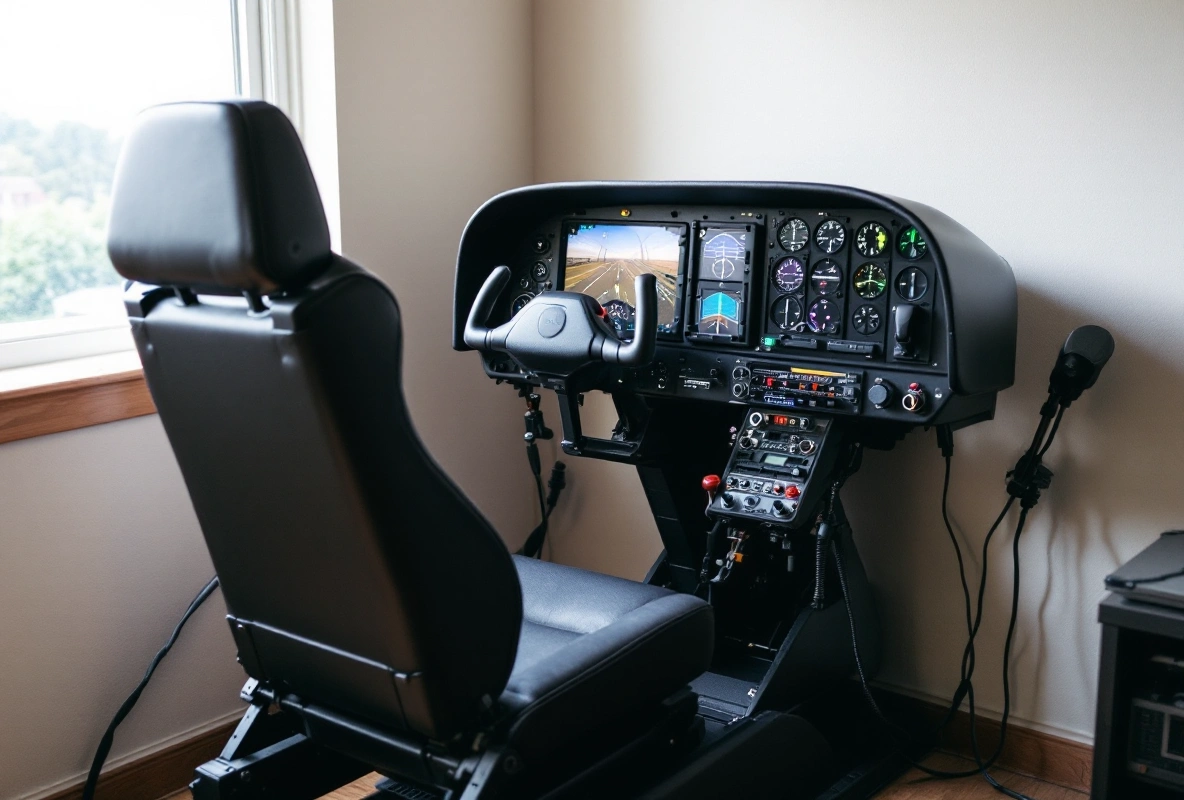
A full seated cockpit is a different commitment. As a size guide, Next Level Racing lists 153 x 99 x 122 cm (L x W x H) for its Flight Simulator cockpit. Plan for roughly 1.5 m by 1 m of floor space once you add room to sit down and stand up.
It is a permanent fixture, not something you fold away after each session. So it only makes sense in a room you can give to it. Our flight simulator cockpit hub covers current frames at that tier.
Budget planning: hardware first, frame second
The costliest mistake in a home flight sim setup is buying the frame before the hardware. A frame is a mounting structure. It holds your controls, but it includes none of them. Different frames also list different brands that fit.
Spend your first budget on the controls for the planes you want to fly. Check that they work on your platform, PC or Xbox. Only then shop for a frame that is confirmed to fit what you bought. Our flight controller guide is a good place to start.
Weight is a real planning factor, not a footnote
A full cockpit frame is heavier than most furniture in a typical room. Next Level Racing lists 49.5 kg (109.1 lbs) for its base Flight Simulator cockpit once assembled. It lists 80 kg (176 lbs) for its Flight Simulator Pro model.
Factor that weight into where you place it. It matters if you live on an upper floor, rent your home or plan to move the setup between rooms. You won't move it on a whim once it is built.
Think about the room, not just the rig
A sim setup competes with everything else a room is used for. It might be a shared home office, a spare room or a corner of a living room. In any of those, a mount setup keeps the room flexible, since the hardware comes off when you need the space.
A full cockpit doesn't give you that. Once it is built, moving it is a real job with real weight, not a five-minute rearrangement. Decide honestly whether you can give up part of that room for good, before you buy anything sized for that commitment.
Power, screens and cables
Every home flight simulator setup needs power and a screen within reach. A desk setup can use your existing monitor and outlets. A cockpit placed in the middle of a room needs a monitor stand or mount and power cables that reach it. Plan the cable run before you place the frame. Taping cables across a walkway is a trip hazard and wears the cables fast.
A realistic starting order
Start with hardware you can return or resell if it doesn't suit you. Move to a chair or desk mount once you know you are keeping that hardware. Only commit to a full cockpit once you have flown regularly for long enough to know your control layout won't change.
Who this guide is for
This guide is for someone working out how much space and budget a home flight simulator setup needs before buying anything. It helps most when floor space or a shared room is a real limit. If you have settled that question and want specific frames, the cockpit hub above covers that next.
Verdict: planning a home flight simulator setup
Start at the mount tier if space or budget is tight. Only move to a full seated cockpit once you know the room can give up about 1.5 m by 1 m for good, and you fly often enough to justify it. Plan a home flight simulator setup around the space you have, then buy hardware to fit it.
FAQ
How much room do I actually need for a home flight sim setup?
If you are mounting hardware to a desk or chair, none beyond the desk or chair itself. If you are planning a full seated cockpit, budget roughly 1.5m by 1m of floor space plus clearance to get in and out of the seat.
Can I set this up in a shared or small room?
Yes, if you stay at the mount tier. A dedicated cockpit frame is a permanent, fairly heavy object, Next Level Racing's models weigh 49.5 to 80 kg once assembled, so it is a poor fit for a room you need to reset for other uses regularly.
What should I budget for first?
Your control hardware, stick, throttle or yoke, before any frame or furniture. A frame only matters once you know what it needs to hold, and buying one first risks a compatibility mismatch with whatever hardware you choose afterward.
Do I need a special desk or chair?
Not necessarily. Most mounting hardware is built for standard desk thicknesses or chair armrest sizes. Check the mount's stated range against your own desk or chair before buying if either is unusually thick, thin or oddly shaped.